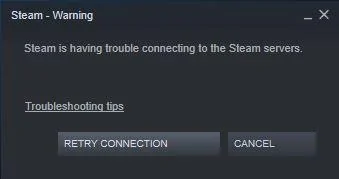
Steam has the largest user count compared to all other online PC game stores. Some users complain that they are dealing with Steam warning Steam is having trouble connecting to Steam servers issue. This server issue prevents users from logging into their accounts. This can be very frustrating for a person who has bought games in their Steam account and now can’t log in to play them. You can start Steam into offline mode but that isn’t exactly a solution.
There’s a small chance that this error could be on the Steam server’s end. Another reason why this error usually shows up is because of unconfigured/corrupted network settings, internet connection problems on your end, or it may be due to conflicting software. Another possibility is Windows Firewall blocking internet access for Steam.
Before moving on to our advanced fixes try out these basic fixes to see if your problem’s resolved.
- Check Steam Server Status from this unofficial website.
- Close any conflicting software like Anti-virus, VPNs, P2P File Sharing apps, download managers, or even IP filtering or blocking programs.
- Restart the router and ONT device (If you’re using optical fiber) and see if that makes a difference.
- Log in with another Steam account. If login is successful then try to log back into your original account. Sources say that this method works for them.

If the Steam is having trouble connecting to Steam servers error is still not resolved then proceed to the advanced fixes given below.
How To Fix Steam Is Having Trouble Connecting To The Steam Servers
1. Run Steam as an Administrator
A Steam Community member reported that they were able to log into Steam by giving it admin privileges. However, they said that anytime Steam is not running as an admin the problem returns.

Right-click on Steam.exe or the Steam shortcut and click Run as admin. If running it as admin works in fixing the error for you then go ahead and make this change permanent by following the steps below:
- Right-click on the Steam shortcut on the desktop and click on Properties.
- Go to the Compatibility tab and put a check next to “Run this program as an administrator”.
- Click Apply then OK to save the changes.

2. Allow Steam Through Windows Firewall
It is possible that Windows Firewall is blocking internet access to Steam. In this case, Steam will show this specific network error and the user cannot log into their account unless Steam’s allowed through the Firewall, to do this follow the simple steps below.
- Open Control Panel and view all icons.
- Open on Windows Defender Firewall.
- Click on “Allow an app or feature through Windows Defender Firewall”.
- In this new window click on Change Settings.
- Scroll down in the list and spot Steam and make sure both Private & Public boxes are checked.
- Press OK to save changes.

3. Flush DNS
Flushing DNS can help to resolve problems with internet connectivity. It can also be helpful if you are experiencing problems like Steam not connecting or getting network errors when logging into Steam. Flushing the DNS is simple and you should certainly do it because there isn’t any downside to it. Follow the steps below to flush the DNS.
- Type in CMD in the Windows Search Bar. Right-click on Command Prompt and click on Run as admin.
- In the Command Prompt window type in “ipconfig /flushdns” and press enter. (without the “”)
- You should see the response “Successfully flushed the DNS Resolver Cache”.

Note: If you’re applying this fix then it is recommended to apply the Renew Your IP step also before launching Steam to see if the fixes have worked.
4. Renew Your IP
When you renew your IP address, you are sent a request to the DHCP server to assign you a new IP address. This can be helpful if your current IP address is not working properly and preventing Steam from logging in. To renew your IP address via the Command Prompt follow these steps.
- Launch Command Prompt (CMD) as an admin like in 3rd fix.
- Type in ipconfig /renew and press enter.

- Once the process is complete, restart your PC and try to log in to Steam and see if the Steam is having trouble connecting to the Steam servers problem’s fixed.
5. Reset Winsock & TCP/IP Stack
If the above two command lines did not fix the issue for you then try out this fix. Multiple users on different sites have reported that this method fixes their Steam network issues. Even if you don’t try any other method on this list you must give this specific fix a shot.

If you’re interested in applying this fix follow the steps below:
- Launch Command Prompt as admin.
- Type in the command “netsh winsock reset catalog” and press Enter.
- Once you see the response “Sucessfully reset the Winsock Catalog” go ahead and type in the next command.
- Type in the next command “netsh int ip reset”.
- Once done with that. Restart your PC.

Once the PC restart is complete go ahead and startup Steam. Hopefully like the rest of the users for whom this fix worked you can now log in to your account and access your games.
6. Modify Steam Properties
Steam by default uses UDP which makes sending data between devices faster. This comes at the cost that if there are any errors in transmitting data they won’t be detected and data delivery between devices isn’t guaranteed too. TCP on the other hand is a slower connection-oriented protocol but can guarantee data delivery. It can also detect if there are any errors during said data delivery.
Hence we recommend switching Steam to TCP protocol if you’re facing a Steam warning – Steam is having trouble connecting to the Steam servers. Here’s how you can switch Steam to TCP protocol.
- Right-click on Steam’s shortcut on the desktop.
- If you don’t have a Steam shortcut then right-click on the Steam.exe and click “Create shortcut”.
- Under the Shortcut tab in the Target section.
- Type in -tcp in front of “C:\Program Files (x86)\Steam\Steam.exe”
- Click Apply then OK to save changes.
Note: Make sure to leave a space between “C:\Program Files (x86)\Steam\Steam.exe” and -tcp

7. Update Network Adapter Drivers
If the problem is indeed on your end and none of the above fixes have worked for you then updating the Network Adapter drivers can sometimes solve problems like this specific Steam network error. You can update these drivers manually through Device Manager as shown in the pic below.

There is a chance that this way you may install the wrong drivers or you might have trouble finding out what network adapter device you use. For this reason, we recommend using Driver Easy it will do all the work for you and provide you with the latest drivers after identifying all of your installed hardware.
8. Reinstall Steam
If nothing else has worked then the last option remaining is reinstalling Steam. Reinstalling software can fix all sorts of issues including the Steam is having trouble connecting to the Steam servers error. Go ahead and uninstall Steam through Add or Remove Programs menu. Restart your PC and make sure that no old Steam files are present in its previous install directory. Once done with this go ahead and reinstall it to see if the Steam network error is still present or not.
Note: Make sure to move the steamapps folder to another location before uninstalling. Once Steam is done reinstalling replace the new steamapps folder with the older one. Doing this will ensure that your games don’t have to be reinstalled.