Dead Island 2 is a popular survival horror game that takes players on a journey through a post-apocalyptic world filled with zombies and other creatures. However, some players have reported experiencing frequent crashes on startup when playing the game on PC.
This can be a frustrating issue to deal with, especially if you’re excited to dive into the game. In many cases, this problem occurs due to incompatible system requirements, problematic GPU drivers, problematic game components, and Third-party Services. Fortunately, there are several effective solutions that can help fix Dead Island 2 keeps crashing on startup on a PC.
In this article, we will explore some of the common causes of this issue and provide step-by-step instructions on how to troubleshoot and fix it.
How to Fix Dead Island 2 Keeps Crashing on Startup on PC
To resolve your issue, you need to
- Make sure that your PC meets the game’s minimum requirements.
- Update the game & Windows.
- Add an exception to your anti-virus.
- Update DirectX and Visual C++ Redistributables.
- Close unnecessary background Tasks.
- Run the game as an administrator.
- Clear shader & web cache.
In case the problem still persists, then try the below potential fixes;
1. Verify the Game Files Integrity
You need to verify the game file integrity because if your game files are missing, corrupt, or damaged, Dead Island 2 crashing becomes an unavoidable problem. This method has been proven effective by many players and hopes it works for you too. To do so, just follow the below steps;
- Open Steam > Click on Library > Go to Home.
- Right-click on Dead Island 2 > Click on Properties.
- Go to the Local files tab > Click on Verify integrity of game files.

2. Update the GPU Driver
An outdated display driver is a common culprit for Dead Island 2 crashing on your PC. This can cause an infinite loading screen and prevent the game from launching. Updating your display driver is an effective solution to this problem. To update the GPU drivers, follow the below steps;
- Press Win + X on the keyboard and then click on Device Manager and expand Display adapters.
- Right-click on the graphics card, and click on Update driver.
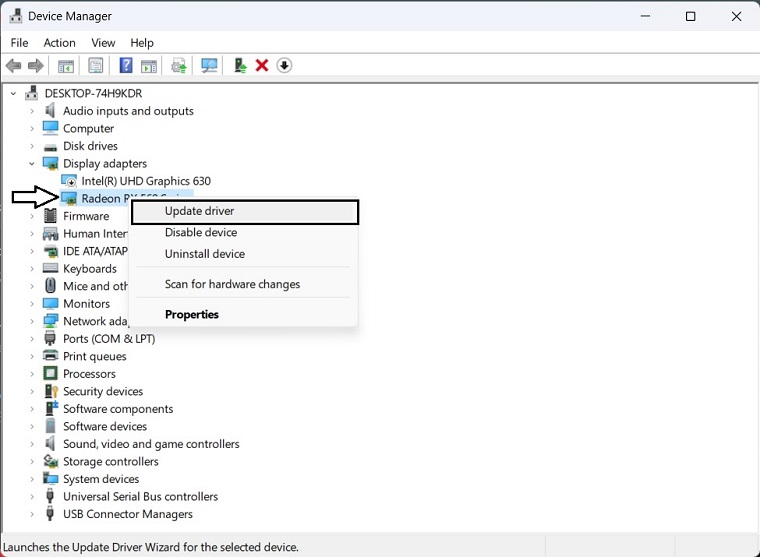
- Choose Search automatically for drivers and update the driver.
In order to update the GPU driver, NVIDIA and AMD do release game-specific updates that you can download and install on your PC. But it takes time and if you are a newbie who doesn’t have skills then you might end up downloading the wrong drivers.
So, we suggest Driver Easy to update your graphics card driver quickly and efficiently. Unlike the device manager, it can update all drivers with a single click and has a broader database for detecting the latest drivers.
3. Force Use the Dedicated GPU
In case your PC has two GPUs, then switch to the dedicated GPU on which you want to play the game. This can help you to resolve your issue. To do so, just follow the below steps.
Nvidia:
- Right-click on the desktop screen.
- Open Nvidia Control Panel.
- Go to 3D Settings.
- Click on Manage 3D Settings.
- Open Program Settings.
- Select Dead Island 2 from the list.
- Select High-Performance Nvidia Processor as the preferred graphics processor for this program.
- Make sure to save changes and reboot the PC.
AMD:
- Right-click on the blank desktop screen.
- Open Radeon Settings.
- Head over to Additional Settings.
- Go to Preferences.
- Click on Power.
- Click on Switchable Graphics Application Settings.
- Select Dead Island 2 from the list (If the game is not visible, select Add Application to include the game)
- Select High Performance from Graphics Settings.
- Finally, reboot the PC to apply changes.
4. Disable AMD FidelityFX Super Resolution 2
If you are an AMD user, try to disable AMD FidelityFX Super Resolution 2. To do so, just follow the below steps;
- Open the AMD Radeon software on your PC. You can do this by right-clicking on your desktop and selecting “AMD Radeon Software” from the context menu.
- Click on the “Gaming” tab located in the bottom-left corner of the screen.
- Next, click on the game title you want to disable FidelityFX Super Resolution for. If the game is not listed, you can add it by clicking the “+” icon and selecting the game’s executable file.
- After selecting the game, scroll down and look for the “Graphics” section. Here, you’ll find several options related to the game’s graphics settings.
- Locate the “FidelityFX Super Resolution” option and toggle it off. This will disable the feature for the selected game.
- Finally, click on the “Save” button located in the bottom-right corner of the screen to apply the changes.
5. Disable Fullscreen Optimizations
To fix compatibility issues on some PCs, disabling full screen optimizations by the Windows system for your game application file may help. Verify that it’s disabled, as it’s not enabled by default.
- Locate the Epic Games Launcher executable file: Navigate to the folder where the Epic Games Launcher is installed on your computer. By default, it should be in
C:\Program Files (x86)\Epic Games\Launcher\Portal\Binaries\Win64. - Find the executable file: Within the Win64 folder, locate the Epic Games Launcher executable file, named
EpicGamesLauncher.exe. - Open Properties: Right-click on the
EpicGamesLauncher.exefile and select ‘Properties’ from the context menu. - Compatibility tab: In the Properties window, click on the ‘Compatibility’ tab.
- Disable fullscreen optimizations: Check the box next to ‘Disable fullscreen optimizations’ under the Settings section.
- Apply changes: Click on the ‘Apply’ button and then on ‘OK’ to save your changes.
Now, fullscreen optimizations should be disabled for the Epic Games Launcher, which can potentially improve performance and reduce latency during gameplay.
6. Disable Third-Party Overlay Apps
To do so, just follow the below steps;
Disable Discord Overlay:
- Open the Discord app > Click on the gear icon (Settings) at the bottom.
- Select Overlay under App Settings > Turn on the Enable in-game overlay.
- Click on Games > Select Dead Island 2.
- Make sure to turn off the Enable in-game overlay toggle.
- Once done, reboot your PC to apply changes.
Disable Xbox Game Bar:
- Press the Windows + I keys to open Settings.
- Now, click on Gaming > Go to Game Bar.
- Turn Off the Record game clips, screenshots, and broadcasts using the Game bar option.
- Once done, save changes, and reboot the PC to apply changes.
Disable Nvidia GeForce Experience Overlay:
- Launch the Nvidia GeForce Experience app > Go to Settings.
- Click on General > Disable the In-Game Overlay option.
- Once done, restart the PC to apply changes.
Some PC gamers or advanced users also use other overlay apps such as MSI Afterburner, Rivatuner, RGB software, etc. If you’re also using any other mouse or keyboard software or any RGB tool which isn’t necessary that much during gaming, then it’s better to turn them off.
7. Enable High-Performance Mode
Insufficient power supply to the computer can also cause Dead Island 2 to fail to load. To solve this issue, enabling high-performance mode for both graphics and power settings is recommended. The following steps can be followed to enable high-performance mode:
- Press Win + I on the keyboard to open Windows Settings.
- Go to System and then click on Display.

- Navigate to Graphics.
- Locate Dead Island 2 in the list. If you don’t see it, manually add it by clicking on the Browse button.
- Click on it and then click on Options.
- Tick on High Performance and then click on Save.

- Again, go to System and click on Power.
- Change the Power Mode to the Best Performance.

After trying all these steps, just restart your PC.
8. Perform a Clean Boot
Performing a clean boot on your PC can fix system boot-up issues by preventing resource-heavy tasks and apps from starting up. This has been reported to work by multiple users and can improve your overall system performance. To perform a clean boot, follow the simple steps below and enjoy a smoother, more efficient PC experience.
- Press the Windows + R keys to open the Run dialog box.
- Type msconfig and hit Enter to open System Configuration.
- Go to Services > Click on Hide all Microsoft services to enable it.

- Now, click on Disable all so that the rest of the services gets turned off.
- Click on Apply and then OK to save changes.
- Next, go to Startup > Click on Open Task Manager.
- Click on the Startup tab > Ensure to select the specific task that has a higher startup impact.
- Now, click on Disable to turn it off.
After applying all these steps, just restart your PC.
9. Restore Default to Overclocked CPU or GPU
Overclocking your PC’s CPU or GPU can sometimes cause conflicts with other hardware, leading to bottleneck issues and game crashes. To check for this, it’s recommended to disable or restore the overclocked settings to factory defaults.
There are several tools available online, such as MSI Afterburner, Riva Tuner, AMD Ryzen Master, and EVGA Precision X, that can help you adjust your overclocked CPU or GPU settings.