WWE 2K23 is one of the most anticipated games of the year. However, it’s frustrating when you encounter an issue where the game crashes on startup or won’t launch at all. There could be several causes behind this issue, ranging from outdated hardware to corrupt game files.
This issue is often caused by outdated hardware or corrupt game files. Outdated hardware that doesn’t meet the game’s minimum requirements can cause crashes or prevent the game from launching. Corrupt game files can occur during installation or while the game is running.
To fix WWE 2K23 crashing on startup or not launching, you need to make sure that your hardware meets the minimum requirements to run the game, try updating your graphics drivers and Windows or console system software, try verifying the game files, deleting & reinstalling the game, and clearing the cache. It’s important to take care of these issues as soon as possible to avoid further frustration and enjoy the game to the fullest.
How To Fix WWE 2K23 Crashing on Startup or Won’t Launch
To fix your issue, follow the below fixes;
1. Check System Requirements
Firstly, check if your PC meets the game’s system requirements to avoid startup crashes or launch issues. Upgrade software/hardware if necessary.
Minimum Requirements:
- Requires a 64-bit processor and operating system
- OS: Windows 10 64-bit
- Processor: Intel Core i5-3550 / AMD FX 8150
- Memory: 8 GB RAM
- Graphics: GeForce GTX 1060 / Radeon RX 480
- DirectX: Version 12
- Storage: 80 GB available space
- Sound Card: DirectX 9.0c compatible sound card
- Additional Notes: SSD recommended, AVX – Compatible processor
Recommended Requirements:
- Requires a 64-bit processor and operating system
- OS: Windows 10 64-bit
- Processor: Intel i7-4790 / AMD FX 8350
- Memory: 16 GB RAM
- Graphics: GeForce GTX 1070 / Radeon RX 580
- DirectX: Version 12
- Storage: 80 GB available space
- Sound Card: DirectX 9.0c compatible sound card
- Additional Notes: SSD recommended, AVX – Compatible processor
2. Run the Game as an Administrator
- Go to the installed WWE 2K23 game directory.
- Right-click on the application file on your PC.
- Click on Properties > Click on the Compatibility tab.
- Click on the Run this program as an administrator checkbox to enable it.

- Once done, click on Apply and then OK to save changes.
- Finally, double-click on the game app file to launch it.
If, in case, you’re running the game via Steam, perform the same steps for the Steam application too.
3. Disable Full Screen Optimization
To do so, just follow the below steps;
- Open the Steam client > Click on Library.
- Right-click on WWE 2K23 > Click on Manage.
- Click on Browse local files > Head over to WWE 2K23 installed folder.
- Right-click on WWE 2K23.exe > Click on Properties.
- Go to the Compatibility tab > Ensure to click Disable fullscreen optimizations to checkmark it.
- Once done, click on Apply and then OK to save changes.
4. Update GPU Driver
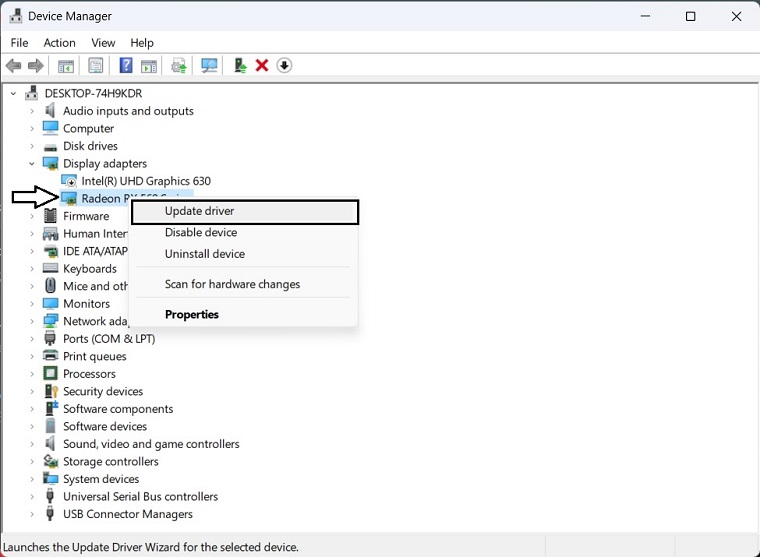
An outdated display driver is a common culprit for WWE 2K23 being stuck on the loading screen on your PC. This can cause an infinite loading screen and prevent the game from launching. Updating your display driver is an effective solution to this problem. To update the GPU drivers, follow the below steps;
- Press Win + X on the keyboard and then click on Device Manager and expand Display adapters.
- Right-click on the graphics card, and click on Update driver.

- Choose Search automatically for drivers and update the driver.
In order to update the GPU driver, NVIDIA and AMD do release game-specific updates that you can download and install on your PC. But it takes time and if you are a newbie who doesn’t have skills then you might end up downloading the wrong drivers.
So, we suggest downloading Driver Easy software to update your graphics card driver quickly and efficiently. Unlike the device manager, it can update all drivers with a single click and has a broader database for detecting the latest drivers.
5. Force Use the Dedicated GPU
In case your PC has two GPUs, then switch to the dedicated GPU on which you want to play the game. This can help you to resolve your issue. To do so, just follow the below steps.
Nvidia:
- Right-click on the desktop screen.
- Open Nvidia Control Panel.
- Go to 3D Settings.
- Click on Manage 3D Settings.
- Open Program Settings.
- Select WWE 2k23 from the list.
- Select High-Performance Nvidia Processor as the preferred graphics processor for this program.
- Make sure to save changes and reboot the PC.
AMD:
- Right-click on the blank desktop screen.
- Open Radeon Settings.
- Head over to Additional Settings.
- Go to Preferences.
- Click on Power.
- Click on Switchable Graphics Application Settings.
- Select WWE 2k23 from the list (If the game is not visible, select Add Application to include the game)
- Select High Performance from Graphics Settings.
- Finally, reboot the PC to apply changes.
6. Close Unnecessary Background Tasks
To avoid in-game lags and improve performance, close unnecessary background tasks. Follow simple steps to reduce the load on your system resources and enjoy a smoother gaming experience.
- Press the Ctrl + Shift + Esc keys to open Task Manager.
- Click on Processes and check which task is consuming higher resources.
- Just click on the particular process and select End Task to close it forcefully.
- Make sure to do the same steps for each third-party app process that is consuming higher resources.
Once done, close Task Manager, and restart your PC.
7. Verify Game Files
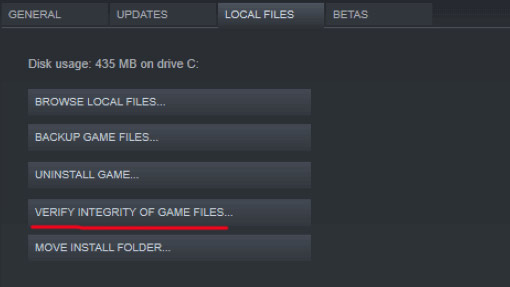
You need to verify the game file integrity because if your game files are missing, corrupt, or damaged, WWE 2k23 crashing becomes an unavoidable problem. This method has been proven effective by many players and hopes it works for you too. To do so, just follow the below steps;
- Open Steam > Click on Library > Go to Home.
- Right-click on The Last Of Us > Click on Properties.
- Go to the Local files tab > Click on Verify integrity of game files.

8. Disable Third-Party Overlay Apps
To do so, just follow the below steps;
Disable Discord Overlay:
- Open the Discord app > Click on the gear icon (Settings) at the bottom.
- Select Overlay under App Settings > Turn on the Enable in-game overlay.
- Click on Games > Select WWE 2k23
- Make sure to turn off the Enable in-game overlay toggle.
- Once done, reboot your PC to apply changes.
Disable Xbox Game Bar:
- Press the Windows + I keys to open Settings.
- Now, click on Gaming > Go to Game Bar.
- Turn Off the Record game clips, screenshots, and broadcast using the Game bar option.
- Once done, save changes, and reboot the PC to apply changes.
Disable Nvidia GeForce Experience Overlay:
- Launch the Nvidia GeForce Experience app > Go to Settings.
- Click on General > Disable the In-Game Overlay option.
- Once done, restart the PC to apply changes.
Some PC gamers or advanced users also use other overlay apps such as MSI Afterburner, Rivatuner, RGB software, etc. If you’re also using any other mouse or keyboard software or any RGB tool which isn’t necessary that much during gaming, then it’s better to turn them off.
9. Turn Off Windows Firewall and Antivirus Software
Background-running third-party overlay applications can frequently lead to conflicts that impact the launch of a game. This is because these apps consume a substantial amount of system resources, much like the processes necessary for starting the game. To disable an in-game overlay on Steam, just follow the below steps;
- Open Steam.
- Click on Steam on the menu and go to Settings.
- Go to the In-game tab.
- Uncheck Enable the Steam overlay while in-game and click on OK.

10. Enable High-Performance Mode
Insufficient power supply to the computer can also cause The Last of Us to fail to load. To solve this issue, enabling high-performance mode for both graphics and power settings is recommended. The following steps can be followed to enable high-performance mode:
- Press Win + I on the keyboard to open Windows Settings.
- Go to System and then click on Display.

- Navigate to Graphics.
- Locate The Last of Us in the list. If you don’t see it, manually add it by clicking on the Browse button.
- Click on it and then click on Options.
- Tick on High performance and then click on Save.

- Again, go to System and click on Power.
- Change the Power Mode to the Best performance.

After trying all these steps, just restart your PC.
11. Perform a Clean Boot
Performing a clean boot on your PC can fix system boot-up issues by preventing resource-heavy tasks and apps from starting up. This has been reported to work by multiple users and can improve your overall system performance. To perform a clean boot, follow the simple steps below and enjoy a smoother, more efficient PC experience.
- Press the Windows + R keys to open the Run dialog box.
- Type msconfig and hit Enter to open System Configuration.
- Go to Services > Click on Hide all Microsoft services to enable it.

- Now, click on Disable all so that the rest of the services gets turned off.
- Click on Apply and then OK to save changes.
- Next, go to Startup > Click on Open Task Manager.
- Click on the Startup tab > Ensure to select the specific task that has a higher startup impact.
- Now, click on Disable to turn it off.
After applying all these steps, just restart your PC.
12. Restore Default to Overclocked CPU or GPU
Overclocking your PC’s CPU or GPU can sometimes cause conflicts with other hardware, leading to bottleneck issues and game crashes. To check for this, it’s recommended to disable or restore the overclocked settings to factory defaults. There are several tools available online, such as MSI Afterburner, Riva Tuner, AMD Ryzen Master, and EVGA Precision X, that can help you adjust your overclocked CPU or GPU settings.
In case the problem still persists, then try to update the Windows & also the game. You can also reinstall Microsoft Visual C++ Runtime to avoid this WWE 2k23 startup crashing.


