The most anticipated role-playing game of 2023 is now released and soon after that many PC players are complaining about Hogwarts Legacy Crashes on launch or start. This is mainly caused due to system requirement problems, outdated graphics card drivers, very old GPUs, compatibility problems, corrupted game files, and using a third-party app or service.
As the game has just been released, it is advisable to wait for the developers to release patches that address the issue of Hogwarts Legacy crashing. Once these patches are available, installing them should resolve the problem.
If you have already installed the latest game patch and still you are dealing with crashing issues on startup or launch. Then this article is for you.
Why does Hogwarts Legacy keep Crashing on Startup or Launch on PC?
If you are the only one encountering the issue, and not your fellow witches and wizards, it could be linked to your PC’s hardware or software. Here, we will outline some of the possible problems.
- Outdated GPU
- Outdated graphics card driver
- Corrupted game files
- Third-party app or service
How to Fix Hogwarts Legacy Keeps Crashing on Startup/Launch PC
As you know the possible reasons, it’s time to jump into the troubleshooting methods below and follow them until the problem gets fixed. Here are all the potential fixes that can solve your crashing problem on startup. So, let’s begin.
1. Check System Requirements
First & foremost, you have to check whether your PC meets the minimum requirements of the game. We’ve provided the requirements for you that might be useful for you. If, in case, your PC build isn’t fully compatible, then make sure to upgrade the specific software/hardware to make it fully compatible.
Minimum Requirements:
- Requires a 64-bit processor and operating system
- OS: 64-bit Windows 10
- Processor: Intel Core i5-6600 (3.3Ghz) or AMD Ryzen 5 1400 (3.2Ghz)
- Memory: 16 GB RAM
- Graphics: NVIDIA GeForce GTX 960 4GB or AMD Radeon RX 470 4GB
- DirectX: Version 12
- Storage: 85 GB available space
- Additional Notes: SSD (Preferred), HDD (Supported), 720p/30 fps, Low-Quality Settings
Recommended Requirements:
- Requires a 64-bit processor and operating system
- OS: 64-bit Windows 10
- Processor: Intel Core i7-8700 (3.2Ghz) or AMD Ryzen 5 3600 (3.6 Ghz)
- Memory: 16 GB RAM
- Graphics: NVIDIA GeForce 1080 Ti or AMD Radeon RX 5700 XT or INTEL Arc A770
- DirectX: Version 12
- Storage: 85 GB available space
- Additional Notes: SSD, 1080p/60 fps, High Quality Settings
2. Update your Drivers
After making sure that your PC meets the minimum requirements of the game, you should now update the graphics card driver to the latest version before trying other methods. It is because, in most cases, the driver issue is the most common reason that triggers this type of problem.
There are two ways to find the correct and the latest driver:
- Manually: On a regular basis, manufacturers of graphics cards will release graphics drivers optimized for the latest titles. These drivers can be downloaded from their websites, either AMD or NVIDIA , and installed manually. However, manual driver updates can be time-consuming and prone to errors. For a more stress-free process, consider the second option described below.
- Automatically: In the event that you lack the time, patience, or technical know-how to manually update your video driver, you have the option to download Driver Easy to do so automatically. With this tool, Driver Easy will identify your system and locate the appropriate drivers for your specific GPU and Windows version, ensuring they are downloaded and installed accurately.
3. Disable the Background Tasks
To optimize system resources and minimize the risk of third-party service interference with Hogwarts Legacy, it is recommended to disable as many non-essential background tasks as possible. To do so, follow these steps:
- Right-click on the Taskbar and go to Task Manager.
- Make sure you are in the Processes tab.
- Select the process you want to disable and click on End Task.

- Do it for any unnecessary background tasks which are related to third-party software.
4. Update DirectX
If the Hogwarts Legacy keeps crashing on your PC at startup on windows 10, then make sure that DirectX is typically installed alongside every game, and if the D3D installer version on your PC is not up-to-date, you may experience game crashes and other related issues. It is worth noting that there is no separate package for DirectX available on Windows, so the only way to update it is through Windows Update.
You can check for Windows Updates manually by using the steps below:
- Press the Windows logo key + I (i) together.
- In Settings, click Update & Security.
- Select Windows Update and click Check for updates.
- Follow the on-screen instructions so that Windows Update will automatically download & install the latest DirectX for you (included in the updates).
- Reboot your PC and launch the game to see the difference.
5. Run the Game as an Administrator
If you are still encountering the Hogwarts Legacy keeps crashing on startup on PC on windows 11, then try launching the game with administrative rights. For many users, it has worked like magic. Here are the steps to do it:
- Locate the game installation folder.
- Right-click on the hogwarts.exe file and go to its properties.
- Navigate to the Compatibility tab.
- Tick Run this program as an administrator.

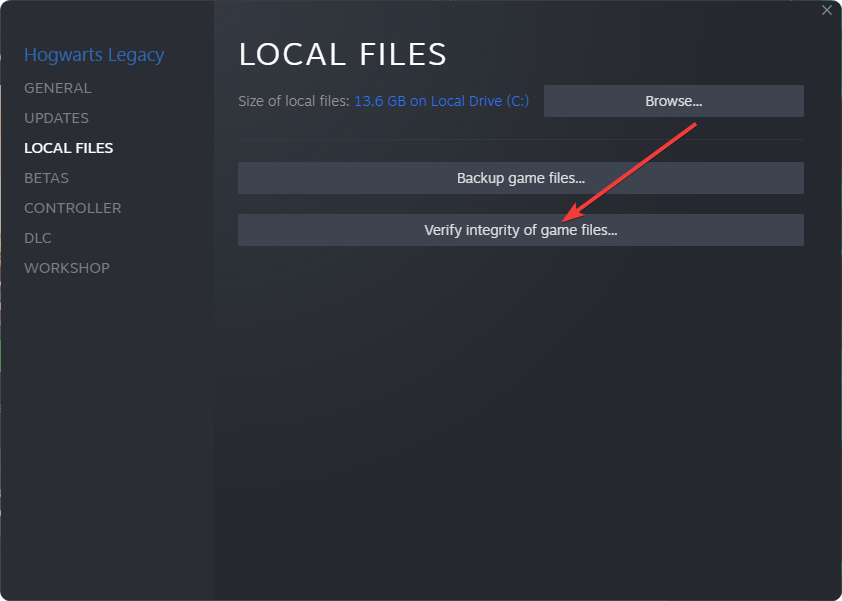
6. Verify the Integrity of the Game files
To tackle this Hogwarts Legacy crashing on PC at startup on windows 7 issue, verify the game files on steam. To do that, just follow the below steps.
- Open Steam.
- Right-click on Hogwarts Legacy and go to Properties.
- Go to the Local files tab.
- Click on Verify integrity of game files.

7. Stop Overclocking your GPU
If you are overclocking a component in your computer, such as your graphics card, try disabling overclock or resetting components to manufacturer specifications. Some users said disabling their GPU overclock seems helped.
8. Disable third-party software
Certain third-party software may lead to performance problems and game crashes during launch, loading, or gameplay. This can include features like RGB settings on your keyboard. To see if this is the cause of the issue, you can try temporarily disabling these settings if your keyboard supports them.
Disable Discord Overlay:
- Open the Discord app > Click on the gear icon (Settings) at the bottom.
- Select Overlay under App Settings > Turn on the Enable in-game overlay.
- Click on Games > Select Hogwarts Legacy.
- Make sure to turn off the Enable in-game overlay toggle.
- Once done, reboot your PC to apply changes.
Disable Xbox Game Bar:
- Press the Windows + I keys to open Settings.
- Now, click on Gaming > Go to Game Bar.
- Turn Off the Record game clips, screenshots, and broadcasts using the Game bar option.
- Once done, save changes, and reboot the PC to apply changes.
Disable Nvidia GeForce Experience Overlay:
- Launch the Nvidia GeForce Experience app > Go to Settings.
- Click on General > Disable the In-Game Overlay option.
- Once done, restart the PC to apply changes.
Disable Steam Overlay:
- Open the Steam client > Click on Library.
- Right-click on Hogwarts Legacy > Click on Properties.
- Click on General > Turn OFF the Enable the Steam Overlay while in-game option.
- Once done, reboot the PC to change the effects.
9. Lower the in-game Settings
Even if your system meets the minimum specifications for the game, increasing the settings will put more workload on your hardware. In this case, lowering settings to the medium can be helpful.
The minimum system requirements for a game list the essential hardware components required for the game to function, typically on lower graphics settings. It’s important to note that even if your system meets the recommended specifications for a game, enabling specific rendering quality options may lead to a negative impact on performance and stability.
10. Reinstall the game
If none of these fixes helps you to solve your crashing problem, then reinstall the game.
- Open Steam and click on Library.
- Right-click the game and select Uninstall.
- After the process completes you can reinstall the game by left-clicking on the game name within your Library and selecting Install from the game page that appears.
If you’re still facing the issue then Turn Off Windows Firewall and Antivirus Software, Reinstall Microsoft Visual C++ Runtime, and Perform a Clean Boot. These fixes will sort out your crashing problem.


