The traditional Windows 10 Start Menu Search bar button is one of the most recognizable and pretty useful Windows key.
However, for many reasons the Windows 10 start menu won’t open.
The article below provides a complete solution to fix start menu in windows 10.
Keep Readin’…
How Do I Fix Windows 10 Start Menu Search that’s not Working?
Below are the troubleshooter steps to unlock the Start Menu in Windows 10.
Solution 1 – Check For the Windows Updates
Make sure you keep your Windows 10 up to date, because often the updates available will help fix the problem.
But, yes do check it manually. Sometimes issues prevent updates from downloading automatically.
You can do this by doing the following:
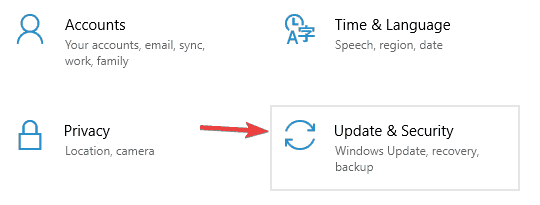
- Press Windows Key + I to open the Settings app.
- Now go to the Update & Security section.
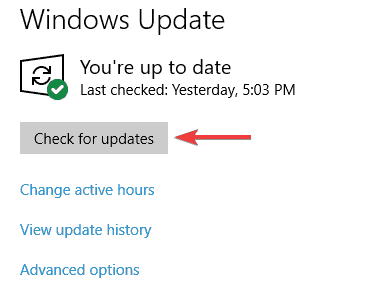
- In the right pane, click Check for updates button.
If any updates are available, they will be downloaded automatically in the background. Once your system is up to date, the issue should be completely resolved and your Start Menu should start working again.
Solution 2 – Use the PowerShell to Fix this Issue
Do the following to fix the Start button with PowerShell.
- Right-click on the Start Menu and choose Windows PowerShell. You can also press Windows key + S, type PowerShell and run Windows PowerShell as an administrator.
- Next, paste this into PowerShell:
sfc /scannow- Press Enter to execute it.
This solution will restart your Start Menu.
If the problem does not fix your Windows 10 start menu freeze-up issue, continue troubleshooting.
Solution 3 – Restart Windows Explorer to fix Frozen Windows 10 Start Menu
Start Menu is a part of Windows Explorer. Restarting it has helped many users to fix this issue.
Hence, do the following to restart Windows Explorer to force Start Menu to restart.
- Press Ctrl+Shift+Esc (all at once) to open Task Manager.
- Locate Windows Explorer on the list.
- Right-click it and choose Restart from the option in the menu.

Your Start Menu should get going once Windows Explorer restarts.
Solution 4 – Use Command Prompt
You can use Command Prompt (cmd) to get start menu back on windows 10.
Command Prompt will help to delete certain Cortana files.
These files are temporary files and your PC will recreate them, so do not stress it.
- Press Windows key + X and choose Command Prompt (Admin) from the menu and run it as administrator.
- Run the following commands into the cmd one by one:
CD/d "%LOCALAPPDATA%PackagesMicrosoft.Windows.Cortana_cw5n1h2txyewy"Taskkill /F /IM SearchUI.exeRD /S /Q SettingsThe damaged files will be rebuilt and you should be able to use Start Menu again without issues.
Solution 5 – Modify your registry / Registry Fix
Make a few changes in your registry to fix this problem.
- Press Windows key + R and type in regedit.
- Press Enter or click OK.
- In the left pane, navigate to this key:
HKEY_LOCAL_MACHINESYSTEMCurrentControlSetServicesWpnUserService- In the right pane, double-click Start DWORD
- Set Value date to 4 and click OK.

After making these changes, restart your PC and check if the problem is resolved.
Solution 6 – Create New Values in your Registry
You need to create new values in the registry to try to fix this error.
Perform the following steps:
- Start Registry Editor
- In the left pane, navigate to this key:
HKEY_CURRENT_USERSoftwareMicrosoftWindowsCurrentVersionExplorerAdvanced- In the right pane, right-click the empty space and choose New > DWORD (32-bit) value.

- Enter EnableXamlStartMenu as the name of the new DWORD.
Now, close the Registry Editor and restart Windows Explorer from the Task Manager.
Once the Explorer restarts, your Start Menu should be fine.
Solution 7 – Rebuilt the Index to Fix Frozen Windows 10 Start Menu
Indexing involves the process of inspecting files, emails, and other types of content within your Windows 10 Operating System.
The method also involves cataloging essential data such as words, files locations, metadata, etc.
For example, if you perform a keyword search in Windows Explorer, you are using the indexing process that reviews all the stored data to match your search criteria. This speeds up the search process significantly.
Follow the below steps to rebuild the Windows 10 index.
- Press ‘Windows Key + R’ to open the Run window.
- Now, type in the following command:
control /name Microsoft.IndexingOptions
- Click on ‘Modify’ on the bottom left of the Indexing options window.
- Now, click on the ‘show all locations’.
- Uncheck all the currently ticked locations and select ‘OK’.
- Now, click ‘Advanced and then click ‘Rebuild’ in the troubleshooting section. This may take some time. Click ‘OK’.

- Once the process is complete, open the Run window again.
- Type ‘shutdown /r’ in there to restart your machine.
This should fix your reluctant windows 10 start menu lockup.


